Monday, September 19, 2011

Here Comes the Judge

The Innocent Eye Test
Mark Tansey, 1981
Yesterday I had the honor of judging the 6th Annual Exhibition for the CPSA (Colored Pencil Society of America) District Chapter 119. The show was located in the Sharon Center in Sharon Woods and will be open September 17th 30th, from 10:00-5:00.
I have judged a few shows before and it is not an easy job. I was asked a few times at the opening if I worked in Colored Pencil. I do not. I have of course used them, but never for finished work. That being said, I judged the work under the same standards that I would when viewing any other work.
One does not need to bring in a cow to judge a painting of cows, as in the Mark Tansey painting above.

I gave a small talk at the show and I discussed my method for selecting the winners.
1)Composition. This is where I started in the process. Did the picture have a pleasing and lovely arranged abstraction of shapes on the page? Was there a good and strong center of interest?
2)Color. I think most good work has some Red, Yellow and Blue- meaning, is there color variety (unlike the painting above).  Now, I do not mean specifically those colors, but at least colors in those primary families. So more specifically, something Reddish, something Blueish, and something in the Yellow family.
In addition, the color arrangement should be harmonious and pleasing. Usually, one color is prominent, and the rest are there to feature the "star" color and help set it off.
3)Breadth and Atmosphere. This is the area where drawing and painting can separate itself from photography. If drawing it the interpretation of form, a successful piece must be considered in this way. By carefully managing the relative hardness and softness of edges, the painter can direct the eye and begin to create the illusion of form. I will say this was the one thing most difficult to find while judging this show. Colored pencil, by its very nature, lends itself to extreme detail and sharp edges. It can lead to an image that is hyper-focused and flattened. If I could pick any one thing lacking throughout the show, this would be it. A lot of work would have been greatly improved had there been more soft edges and atmosphere. I would imagine much of the work in the show was completed by copying photos, which are not form, but flat images. A lot of the work would have benefited from more study from life.
4)Subject matter was my final consideration. I did look at mood, story, and the clearness of the message. If I was at all confused about the subject of the picture, it got crossed off the list. While subject is important, it must be clearly stated through good composition, pleasing color, and breadth of treatment. To do otherwise would be like writing a book full of misspellings and bad grammar.
This was a good show and I had fun judging the show, meeting the artists and talking to them about their work- congratulations to all the winners.
First- Cecile Baird  "Twisted Lemon"
Second- Tom Kinarney - " In the Woods"
Third- Cheryl Metzger- "Puppy Dog Tales"
Honorable mentions:
Jean Malicoat- "On the Chopping Block"
Margi Hopkins " Hot Dog"
Marcia Greenwald " All That Jazz"
Nancy Pugliano "Cherries"
Janice Glaser "First Taste of Snow"

Sunday, September 11, 2011

Ten Years Later

Of course we are all reflecting on this terrible day in American history. I thought I would post some of my experiences from that memorable week.

Avenue in the Rain by Childe Hassam (1917)

It was going to be a memorable day for me no matter the events that occurred that morning in Manhattan. I happened to packing my car getting ready to drive 900 plus miles to New Hampshire. I had only been married 3 years to my wife when I got the idea in my head that I needed some serious training if I wanted to be a painter. Laura was very supportive in this decision and traveled with me to Italy to look at a few Ateliers. Oddly, I chose The Paul Ingbretson School of Drawing and Painting in Manchester, New Hampshire without having visited it. It came highly recommended by Carl Samson.
I would like to stress, that I am not much of a traveler. I am also not a very good driver (I was in an accident just a week before- having driven into the side of a tour bus). So the idea of leaving my new wife in Cincinnati, while I drive 900 miles to a place I had never been, not knowing a soul, with no arrangements for a place to live, for an undetermined period of time was pretty daunting already. The plan was to leave early on September 11. As Laura and I where busy packing the car, I decided to check my email and received one from a  friend in Sweden asking "What the hell is going on in NY?" I had no idea.
We turned on the news and so ended the preparations for the trip. We were glued to the TV the rest of the day.
I won't go on about that day, as we all had similar feelings of shock and fear. I did not leave that day. I think it was a few days later before I finally decided the world was not ending and  it was relatively safe to leave. One thing that sticks in my mind about the drive, was to listening to the radio discussing the events and heroic rescue attempts at the site. A few times it was too much and I worked to find any station that was just playing music. It seemed most of the time I was able to find a 70's rock station that was not playing too much news. The nonstop coverage on the stations was just too intense. It is hard to drive if you are crying.

I finally made it to my new home away from home, arriving at the studio the next day. I was of course very anxious in a new place but it only got worse when I was meet at the studio door by a student. I was lucky enough to meet the only student, in Paul's 20 years of teaching, to have been kicked out of the school. He was actually voted out by the other students. He was there packing up his stuff to leave and was not happy about it. There was no one else in the studio.He was very excited to learn that I was also from Ohio and then  went on a tirade about how everyone in the studio was of "noble blood", unlike us Ohioans. He said they were all going to look down on me as being a "lowly Midwesterner".  I began to wonder if I had made a terrible mistake.
He took me on a tour of the area and then out for a beer. He spent the evening telling how he was going to be the next Michelangelo and that he was kicked out of the studio because everyone including Paul was intimidated by him. He also went on and on about how the events of 9/11 were the beginning of a holy war started by Louis Farrakhan and that we should both go sign up with the military to fight the fight. He kept asking me if I loved my wife. If I did, I should go home to her.
This was not what I was expecting to find when I got to the studio. Now, I am a pretty good judge of character and had figured out that this fellow had some issues. Turns out he had a lot of issues. He was very sick and troubled and left offensive and threatening messages on the studio voice mail for years- some mentioning UFO's, black helicopters and Gandalf.
After he finally left for the evening, I was alone in the studio to sleep on the couch  as it stormed outside.  It really was a surreal evening.

Well, once that "introduction" was over, the next morning I finally meet Paul and his students. As soon as Paul began to speak I knew I was in the right place. The students were all there for the same reason, to study the art and craft of painting. We were all there to learn how to see the beauty in the world and represent that beauty on the canvas.
As I reflect on the events of ten years ago and the days following, I have mixed feelings. Of course that day changed things for all of us, but for me it was also the beginning of a life long struggle for Truth and Beauty.

Wednesday, August 24, 2011

Art Students- then and now.

The title of this blog post was going to be "OH MY GOD! WHAT THE HELL IS GOING ON WITH THE WORLD?! WE ALL DESERVE TO DIE IN SOME SORT OF TERRIBLE AND PAINFUL FIERY APOCALYPSE!  SINNERS! SINNERS!!!"

I thought that title may be overly dramatic, so I went with  "Art Students -Then and Now".
Why am I all worked up again, you are asking. Well, today it started with a post I saw on the site ArtDaily.org. This is a site which posts the terribly infuriating and sad news of the arts today. "Why torture myself by reading this" you ask? Well, it does occasionally have some sort of interesting bits of news about  museum shows, artists, archeological discoveries or art auctions. The rest of the stuff .........

I am not a fan of BS. If I were I would have gone into politics.
Truth is beautiful in life and in art. I respect art and artists that follow that model. The rest I dare say borders on being evil. Most contemporary art today is closer to vandalism than it is anything else.

Just to set the tone: In reading a book on one of my favorite artists, Jean-Baptiste Chardin, there were some quotes by him discussing the hard work involved in becoming a painter. He talked being a young student in dusty academies with backs bent over drawing boards copying from the antique and from nature. The years and years of hard work he put into his studies  before he was able to paint beautiful pictures. The genius of Chardin owes much to the training and study he received.
Below is a painting by Chardin of an eager art student working diligently.
Fast forward 300 years.
Here is a photo I found today on Art Daily of art students in training.
These are students of the Royal Academy of Visual Art in The Hague, The Netherlands. 

Let me repeat that... " THE ROYAL ACADEMY OF VISUAL ART!"
Below we see the eager students "diligently" participating in a "Graphic Design workshop".  
They are hard at work with an improvised drawing tool. To quote directly from ArtDaily.org - "Pencils, pens and brushes are stuck to a vibrator that makes drawings on the paper. At the start of the new school year students participate in all kinds of workshops."

I bet they do.
I don't really have to say much more do I? This is not drawing, this is not training, nor does this fit my definition of "Royal" or "Academy". It is a self important playground for a culture with too much free time and too little respect for beauty and truth.

The only thing that should be vibrating on the end of a pencil is an eager and intelligent art student with respect and love for the world around them.

Of course there are schools out there that offer training similar to that received by Chardin. They are not in Universities, Academies or Colleges, they are private training studios. Though they are rarely, if ever mention on Art Daily.org. If you want good training, find artist you like and go study with them. If they hand you a sex toy during a drawing class, ask for your money back and contact your lawyer.

I am still waiting for that fiery Apocalypse.

Wednesday, August 17, 2011

Framing Options

Last post I discussed my newest painting. I have been trying to do standard size paintings so I can easily get frames, but this time I strayed from that promise to myself and painted an arched painting for which a special frame was needed.
I thought I would post the process for making these special frames.You can follow along and make some yourself, though it would be best that you have some basic knowledge of woodworking and own a few tools. If you don't, I suggest you make friends with someone that does- Oh, and by the way. I don't mean me. I have enough friends and this blog post is as far as I am willing to go.

Basic idea here is to take a frame you already have, place a panel in the frame where the painting would normally go, then cut a new opening for a smaller picture. This can be done for any size or shape. This time we will be making an arched insert. I really enjoy the arched top paintings. It is a pleasant shape in which I enjoy composing.
If you have a lot of frames hanging around the studio this also opens up your options. Sometimes a frames is not quite the right size or shape. I have quite the collection of old frames and am adding to that pile all the time. Small paintings often feel better with a big frame on. So you can take a 6 x 8 painting, using one of these panels to add an inch all around, and now the painting and panel will fit an 8 x 10 frame (did that make sense?)

After showing the steps to make the insert I will show you how to apply a painted finish. One "do it yourself" frame finish I am almost always happy with is the flat black, hand rubbed finish. I will explain how that is done at the end of this demonstration.

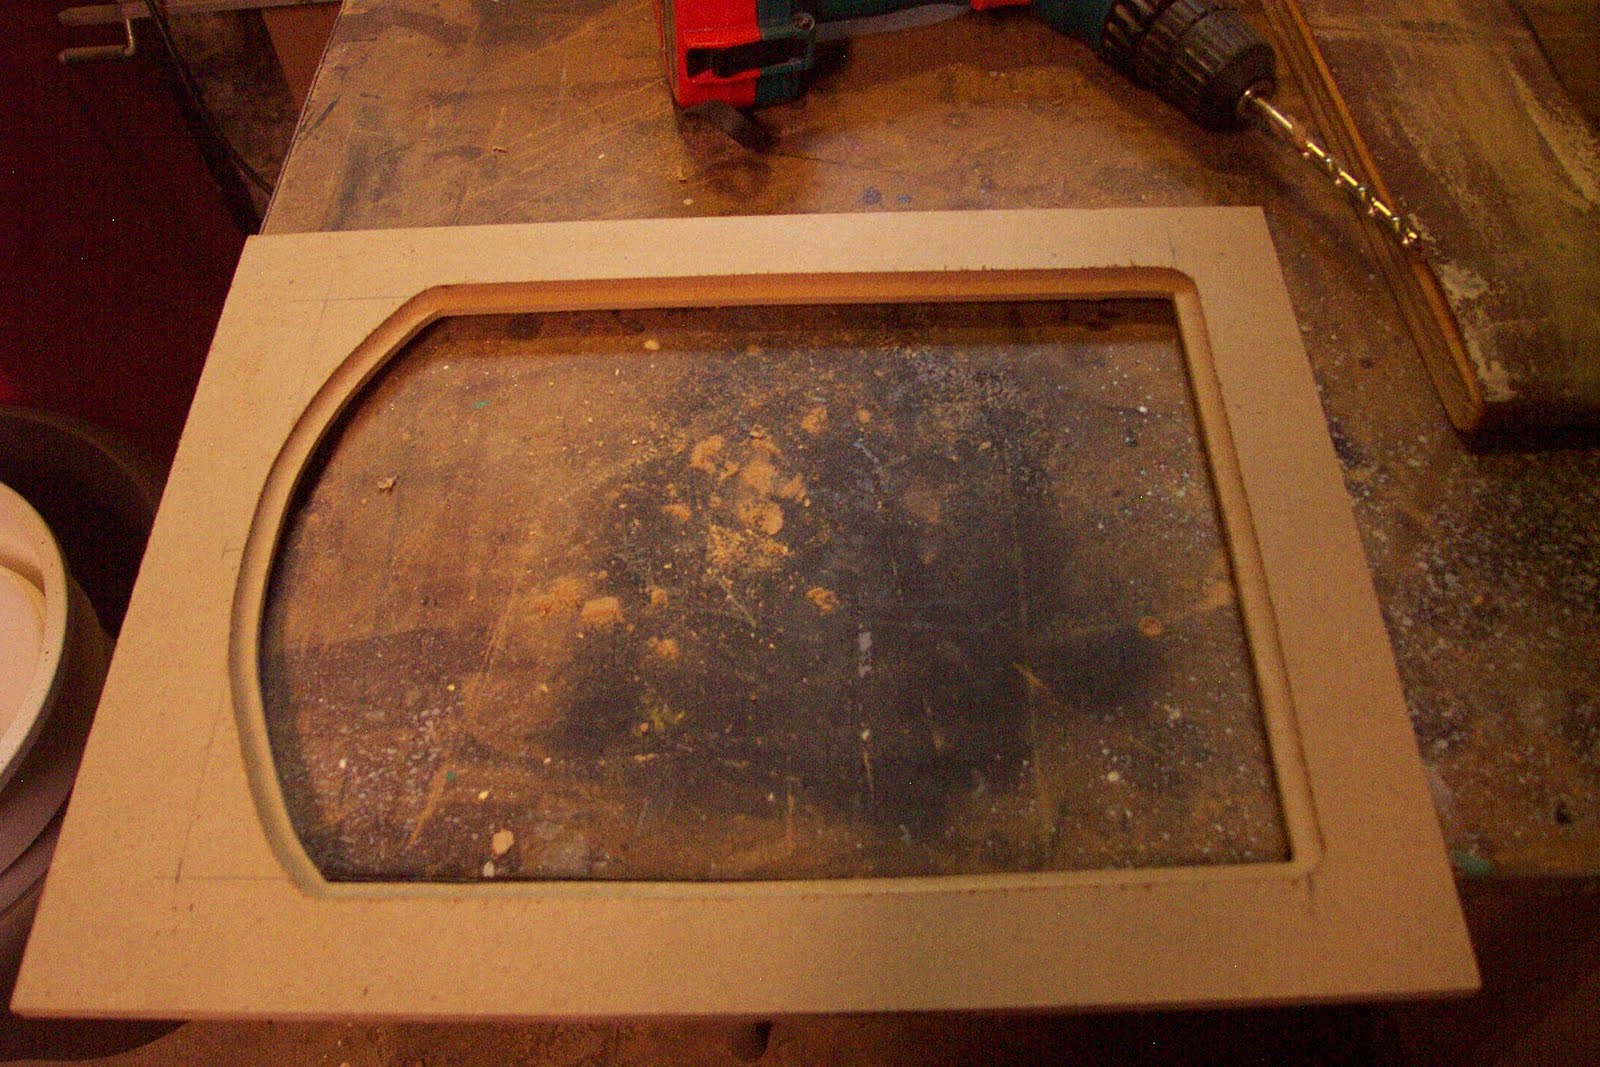
Below is a frame I purchased for $20 at Castner Frames. It is for a 16 x 12 picture, the opening is 15 1/4 by 11 1/4. For my 13 x 9 painting with an arched top, this frame will work perfectly. I just need to make an insert. This is basically like making a fancy matte for a frame out of wood. While I am doing this for an arched top frame, it can be done for a square or oval picture.

Step one- Cut your insert:
I will start with a quote by Norm Abram, one of my heroes. "Before we use any power tools, let's take a moment to talk about shop safety. Be sure to read, understand, and follow all the safety rules that come with your power tools. Knowing how to use your power tools properly will greatly reduce the risk of personal injury. And remember this: there is no more important safety rule than to wear these — safety glasses." 

I have a 16 x 12" frame, so with the rabbit in the back I need and insert that will fit. Measure its exact size to be sure. For my insert I use a material called MDF (Medium Density Fiberboard). It is like a hard cardboard, made of paper fiber, wax and resin. It cuts like wood and takes paint well. You can buy handy 2' x4'  sheets at most hardware stores. For these panels I normally like to use 1/2" thick, but all I had was 3/4". Either thickness will work.
I cut a piece to fit tightly in the frame rabbet- make sure it is square (you can check the diagonals, corner to corner, making sure those measurements are equal). I used a table saw, but a jig saw will work. I penciled out the size and shape of the new opening on the panel, making sure to center it. I drilled holes in the corners big enough to accept the jig saw blade.


Step Two- Cut out opening:
I use my trusty Jig Saw to follow the line as closely as I can.

Step 3- Smooth the cuts:
Using wood files and sand paper (100 grit) I sand the cut edges smooth. This step is important, so spend the time to get this right. You want smooth edged and nice curve. The saw is not exacting and will need to be cleaned up. I have an orbital sander that helped  speed things up. Be careful to not sand at an angle or dig into the corners.
Step 4:- Route the edges:
You will of course need a router and a few bits. You need one bit for the  edge that meets the painting. I used a simple cove bit- shown below on the right. A rabbet bit is used to cut the space in the back of the panel for the painting to fit into. The 45 degree chamfer bit eases the outside edge of the back of the panel were it fits into the frame. This is not necessary, but since I had a larger 3/4 thick board it just looked better. Read all safety precautions when doing this step. MDF resins contain small amounts of Formaldehyde, so wear a mask with cutting and sanding.


If you do not have a router, you could probably file an edge on the front as a transition, and just use z clamps to attach the painting to the back without a rabbet. This will take some time to get your hand filed edge even, but it could be done.

Step 5- Chisel the corners:
The router bits are of course round, resulting in rounded corners. You can leave them, but I think it looks cheap. I use a straight edge to mark off squared edges and use carving chisels to cut them square. I first cut straight into the corner, with a straight blade. Next I carefully make slight cuts on the squared lines I drew. Use the rounded chisel to ease out the material from that corner until it looks like a smooth transition. Sanding is usually required to clean things up. Go slow, as it is easier to take off more than to add some back.


 Step 6- Suck it up and don't be a wuss.
Sorry for the graphic nature of the next image, but I want to demonstrate two things. One, that you need to be careful when using sharp chisels, always cutting away from your hand. Second, I wanted you to see what a total bad ass I am.
Did I stop here? No, I continued on like a man.

Yeah, Sorry about that Norm.

Step 7- Attach insert into frame:
You need to attach the MDF insert into the frame. I used pocket screws, being careful to not screw through the front of the frame. I have done this before. When this happens it is followed by about 15 minutes of profanity, and an extra 30 minutes of work repairing the frame. You can glue the insert in, use nails or just use z brackets as if you were putting a painting in the frame. I also fill the screw holes so it looks better. Not necessary unless you have OCD like I do. Finally, go over the frame, sand any sharp edges front and back, fill any holes and generally make sure the frame is ready for paint. I clean off any dust with a rag or tack cloth.
Step 8- Prime and paint:
I used Red Iron Oxide primer in a spray can to coat the frame. I suggest you do this step outside if you can. You will find any remaining imperfections after you prime it. You can fill and sand those and then prime it again. I usually paint the front and back making sure to cover all the edges. The MDF will suck up a lot of paint. Painting them will make the fibers swell on the edges a bit. Sanding and priming a few times will get them very smooth. After the primer dries (usually I wait 24 hours) I coat it with a fast drying ultra flat black. One trick I do, is to force the paint to crack. I like this look as it adds age and variety. If you want some cracked or wrinkled looked to the finish, Look for a can with  instructions suggesting you recoat it withing two hours or to wait 5 days. Paint will continue to cure even after it is dry to the touch. The paint is still uncured enough within two hours to accept a second coat. The paint will tighten and move as it cures for days. I disobey the directions and paint it after the suggested time. I wait about 4 hours and then spray it with a heavy coat, being careful to not get any runs. I paint heavier on the larger flat surfaces. This top coat which dries and shrinks faster than the under coat will start to crack in a few minutes. This is not an exact science, but it almost always works. I will say on this frame I got just a bit carried away. I prefer the cracking to be a bit more subtle.
 Here is the frame after a final coat. You can click for a close up view to see how the paint cracked.
 Step 9- Silver leafed edge and Final finishing :
I decided to add a silver leaf edge. There is a silver coffee pot in the painting so it will match. A leafed edge can help ease the transition from the frame to painting. I am not a leafing expert. This topic would require its own blog post. I suggest you look elsewhere for gold or silver leaf advice. If you want you can also paint the edge silver or gold. At times that looks almost as good.
I lightly sand the frame, especially the raised edges slightly to get through the black paint to the red primer. This gives it some age, distress and variety. The final step is to use butchers wax. Most hardware stores should carry the wax. Using a clean rag, I scoop up some wax, giving it a nice even coat. I then use Rotten stone, a gray powder used for polishing. I use that to dust the corners and draw around the edges with a brush that has been dipped in the power. Blow off the excess. After the wax as set up a bit, I take a clean soft cloth and buff the frame. It will get a very deep shinny finish. I leave the rotten stone in the corners. It will stick to the wax and give it an aged look that I like. You can see that powder stuck in the cracked paint as well.
 On the back I add the picture wire and the z clips for holding the painting.

Here it is all put together.
I really should stop making frames and just paint more pictures- but wasn't that fun?

Sunday, July 31, 2011

To Do List

The Late Night, 13"x9", oil on linen, 2011, ©Richard Luschek
I just finished this painting the other day and thought I would post some process shots. I am quite pleased with this painting. It has a very comfortable color harmony. I had an arched frame for this piece, though once again I did the painting out too close to the edge of the canvas, so the frame I had cut off some parts I was not happy with. I had to build a new frame for the painting. I will post the process of making the frame some time this week. 


The sketch:
I was up late drinking a lot of coffee. I like coffee, but this night it was to keep me fired up so I could get a pile of illustrations done on time. All my coffee cups were getting stacked up and I really like the rhythm they created. At first I thought the joy I felt from this visual phenomenon was mostly as a result of my caffeine overdose, but the next day after I got out of bed and returned to the desk I was still impressed with the arrangement. As I often do, I screamed out "I shall paint that!"
The next day in the studio I tried to recreate the scene. I enjoyed the curves and movement with all three stacked up, but was a bit much. I played around with a set up for a while till I got something I was happy with. I then did a color sketch on my Nintendo DS.

Day 1:
I am painting on oil primed linen glued to a birch panel. I set up the still life and was going to just dive in, but I got side tracked and had less than two hours to paint before I would loose my light. I decided to lay it in quickly using only burnt sienna. I don't usually do that, but I wanted to mass it in and I knew it would go faster in monochrome.
Day 2:
After it dried I made sure to go in on the second day and cover the canvas as best I could. I felt it was one of the better lay ins I had done- meaning, it had fairly accurate color and value notes and just enough drawing.

 Day 3:
A short day, just refining some of the forms and correcting the drawing.

 Day 4:
Bringing it into focus, I add details as needed. I had a group coming to the studio and I thought it would be fun to play a trick on one of my friends by adding an item to my "to do" list. I quickly painted "Kill Clem" on the painting. It was an hour into our sketch group before anyone noticed. I was thinking I should paint this message into all of my work.

 Day 5:
More finishing and refining. Of course I removed the "Kill Clem" joke and repainted the pad to get more of a light effect in the center of the picture. The coffee had evaporated and was covered in mold, so I cleaned the cup, added more coffee and repainted the cup on the right.

 Day 6- The Final Day:
I now decided I needed to finish the picture with some text. I made up a To Do list, wrote it on the pad in the still life and then did my best to copy it. I did not want the text to be readable, but to just appear as if it could be read. After this I realized the red vertical strip on the right was too dark and chromatic, so I lightened it a bit. Checking it for any other issues I realized the perspective on the cup was off. I repainted it again correcting the curves. A few tweaks and I had all I wanted. I then crossed this painting off my To Do list.

Friday, July 22, 2011

Death of a Modern Realist

Lucian Freud died this week at the age of 88.

During my time studying 'art' in college, Freud was one of two living realist painters we were encouraged to look at. Odd Nerdrum and Lucian Freud were two painters that managed to straddle realism and the modern in an art world  too tired and self important for truth in painting. Since I believed the sole purpose of art was a faithful representation of nature's beauty, study them I did.

While I must admit, after moving out of the study of 'art' and into my study of painting, I do not look at the work of Freud much these days. He was a realist for sure. His paintings are studies of life with crumbly, thick surfaces which are something to behold in person. You can see the journey, the study and the learning. He painted his subject warts and all. As a result he was a brutal painter. His work is often not pleasing. He never idealized his subjects, he painted what he saw. I think it is important to note that he did not refer to his models as "nude" but preferred the term "naked".
He was a hero for me in college, as living heroes were hard to come by. I still admire his work. When you look at a Freud painting you have to wonder if it is about the struggle the artist had visually or if it was something else in the painter. It is not surprising that the grandson of Sigmund Freud's would be so psychological but it often results in paintings that are not fun to look at. They tend to be confrontational and uncomfortable, much like listening in on a therapy session.

A few quotes from Freud:

"A painter must think of everything he sees as being there entirely for his own use and pleasure. The artist who tries to serve nature is only an executive artist. And, since the model he so faithfully copies is not going to be hung up next to the picture, since the picture is going to be there on its own, it is of no interest whether it is an accurate copy of the model. Whether it will convince or not depends entirely on what it is in itself, what is there to be seen."

"Painters who use life itself as their subject-matter, working with the subject in front of them, or constantly in mind, do so in order to translate life into art almost literally, as it were.....it is this very knowledge of life which can give art complete independence from life, an independence that is necessary because the picture, in order to move us, must never merely remind us of life, but must acquire a life of its own..."


Sunday, July 10, 2011

Bridesmade Revisited

My painting A Monster Attacks At Breakfast has been selected as a finalist in the Still Life/Floral category of The Artist's Magazine 28th Annual Art Competition. As a finalist my name will be featured in the December 2011 issue of the magazine.
So, that is three years in a row. It is of course an honor to be selected but I was hoping to win fabulous prizes. Oh well, there is always Next Year!