Showing posts with label Making stuff. Show all posts

Friday, May 12, 2017

The Frame is the Father!

While I do have work in a big show opening tomorrow at the Eisele Gallery, I thought I would chat a bit more about the frame I made for the Star Wars show, hanging until the end of the month at the Brew House. If you and your children are Star Wars fans and you don't show up and buy them some art- someone really should call Child Protective Services on you.
Philosophical Sci-Fi Drive-By, Oil on linen, 20"x10", © copyright Richard Luschek 2017


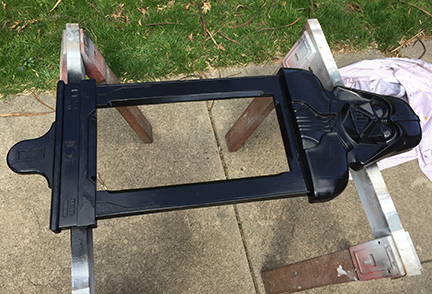
It all started when I bought an old toy case in an auction. Also in that pile of toys was the AT-AT I used in the still life set up for the painting, the R2 cassette player in my other painting, and a C3PO case. I already had a Darth Vader case from my childhood and this one was in bad shape, so I did not feel as bad appropriating it.
First I had to cut the case apart and trim off all the extra plastic. I had to cut into the bottom to make room for a panel and then made a paper template that I would be able to screw to plastic Vader head.


I traced this and added lower frame section on a sheet of 1/2 plywood that I found set out by the street for the garbage. I just wanted a rough shape that I could add the actual frame to.

There were holes in the case for pushing in plastic bands to hold in and lable your Star Wars action figures. I was able to screw into those and secure the panel to the head. Next I cut a square in the panel so I could start adding hardwood to the front.

Again, the hard wood is from a painted shelf I had in my scrap pile.
Now I just had to sand it all and start adding my decorations to it.


The frame looked a bit blocky, so I added some edging, and a finally to really take it over the top I cut a piece for Darth Vader's cod piece. Which, after studying Vader's costume, I realized has a door on it. I guess even Vader needs to use the rest room. Now Im thinking every frame should have a cod piece.
After looking up reference for Vader's belt, I cut the designs out of cardboard and wood. They were glued on and the entire frame was sanded smooth. It was ready for painting. I bought gloss black plastic spray paint. Luckily it was a nice day so I was able to spray outside. I wore a respirator as that paint is pretty noxious.

I had a slight issue when during the second coat, the paint on certain sections started to wrinkle. I had waited what I thought was the correct time between coats (48 hours), but it was a chilly week and had apparently not cured enough. After a temper tantrum, which is very embarrassing in hindsight, I let it dry in my hot van for a few days, sanded it all smooth and gave it a nice clean final coat.


I love that it has a medieval icon look. I have more old toys in my basement, so another Star Wars frame may be in my future.

Tuesday, January 31, 2017

There Is No Try

"Only Do", oil on linen, 11x14, © copyright Richard Luschek 2017
private collection
This year I'd love to post one blog post a week. So far not so good, as this is my first post this year, on the very last day of January. Get off my back.
I completed this painting a while a while ago. It now has a wonderful home in Brooklyn, NY. I had so much fun doing the painting and making the frame that I thought this would be a great topic to ramble on about.

This picture started out as a demo I painted for a group of kids in Ripley, Ohio. I did a talk and demonstration at the library before helping the kids set up and paint their own still lifes.
I have painted something very similar once before, as I am a Star Wars "kid" it is a recurring theme that I have no problem revisiting.
The idea was to have Yoda using the force to lift the toy plane- or at least appear to lift the plane.  You barely notice the coffee cup, right?

Demonstrations are fun- but challenging. I like to talk during demos and I've found I can either talk well, or paint well.  I tend to choose the former so I don't sound like an idiot. Honestly, I thought it turned out OK considering the circumstances.
In a demo you have limited time, limited concentration and in this case an audience of limited attention span. So I stopped when I could tell I was losing their interest- about 35 minutes. Often I will just wipe a demo canvas down and paint something else but I like this one and I decided to set it up in the studio and spend some time finishing it.

Once I got it back in the studio, I tried to set it up similarly to what I had in Ripley. The lighting was very different but it was a better looking composition.
Here are a few shots of the painting in process- each panel representing roughly a day of work. The first panel shows me making sure the drawing and the layout worked. I was painting over the demo painting so I worked a bit more bold then I normally do. Day two I spent time pushing it back, losing edges and getting breadth of treatment.

With the painting complete it was time to consider the frame. I wanted something unique and different. I love playing around and experimenting with frames. Lately I have been trying to spend more time painting and less time framing. That's what frame shops are for.
I had a cheap gold frame that was the right size. I thought this time I would go really crazy and make the frame look like a space station.
First thing I wanted to do was replace the corner flourish with Storm Trooper heads. I mean, this decision was obvious, right?
I made press molds in non-hardening clay and then cast the head by mixing up some Durhams Rock Hard Putty. Its wonderful stuff. I highly recommend it for frame repair, home repair, or any Martha Stewart crafty ideas you may have. Once it hardened they were popped out of the mold and sanded. I had to cast quite a few to get 4 good casts.

I had recently found a part off an old Star Wars toy in the bottom of a junk drawer. Back in the day (mid to late 70's), Star Wars toys came with assembly instructions, a list of parts, and an order form. If something broke you could send the form with proof of purchase into Kenner  and they would mail you a replacement part. The door on my Millennium Falcon broke (probably during an intense battle) so I had ordered a new one. This old broken toy part was perfect for the corners of my frame. I cut it on the band saw to so it fit and laid in on a bed of clay in a Tupperware container so I could make a mold. The piece I cut off was used on another part of the frame.
The first mold was a disaster. I used water based alginate casting material and it did not go well. I was mushy and crumbling as I used it. I tried again with a recipe I found online, using a tube of 100% silicone caulk thinned with mineral spirits, corn starch, a few drops of glycerine and acrylic paint. The next mold, while a bit stinky, was smooth and durable. Again using Durhams, I was able to cast 4 detailed corner pieces. I still have the mold, so this part may appear on more frames in the future.


Next on the list was to make the flat areas look like panels on a space vehicle. I tend to save all the cardboard from the backs of drawing pads. I comes in very handy. I cut panels to fill the areas between the corners, sketched out the designs and then cut them all with bevels. in a random pattern.
They were all numbered, laid out so I didnt get lost and later glued into place.


I used some left over model car parts (I recently have been building a model car for another still life I'm working on), strips of balsa wood, metal thumb tacks, and a piece of a plastic zip tie to decorate the frame.
I spray on automotive primer to seal it. I filled and sanded as needed.


A few coats and it was starting to look unified and smooth. For the final coat I went with a automotive flat gray. Space ship paint from NASA was just too costly.
After I got a few coat, I used brown and blue acrylic washes to tone the frame. I dry brushed raised areas with a light grey to highlight the edges and give it some dimension. Before a final clear coat I dusted it with various powdered pigments to get some age on the frame.

A close-up shot after the weathering and toning.

The frame took at least as long as the painting, but it was worth the effort.


Monday, August 22, 2016

Lord of the Manor

Dragon Attack, oil on linen, 24"X36", © 2016 Richard J. Luschek II
My newest painting in the series "Kids at Play" (that title needs work) is finished and hanging in the Cincinnati Art Galleries. I thought I would blog about the process of getting this image from idea to canvas.
Get ready for a sappy discussion about what these paintings mean to me and how they are developing into a series I think will keep me busy for a while.
I may even use the term 'cathartic' as some point, so grab your barf bag and get ready. Amongst the jibber jabber, I will be posting shots of the long process this still life went through on the way to being a final design ready to paint.
The basic idea was obviously a kid, me specifically, building a castle out of cardboard and the battle that would happen after it's construction. Plus I've been wanting to paint a picture with toilet paper tubes for some time.


I am lucky enough to be doing exactly what I want to do for a living. I get to draw, paint and create all day. Not unlike what I was doing in my childhood. Everyday I go to the studio and play. This fact has, I believe, severely slowed the aging process- at least mentally.
After studying painting, I was mostly worried about the visual. How do I make this blank canvas look like the objects in front of me in value, color and form. Now I'm using that information to tell stories.

Interestingly, the toy knights Ive had since I was 4. When I was in Jr High I painted them all with model paint so I could use them in Dungeons and Dragons games. I decided to spray paint them as they looked originally. They came in an amazing play-set with a big castle made in Germany.

And yes, I still have the castle in a box. Look for it to appear in a painting sometime in the future. This time around I wanted a childlike, homemade feel.


I generally have a terrible memory for past events. I tend to live in a small window of time. I have discussed in previous posts about the interesting things that happens to me when I work on these paintings. I get out my toys- that have been retrieved from my parents attic and basically play with them during the set up process- in a very intelligent and manly way.
Once they are set up I stare at them for hours while I paint. It is a bit of a window to the past. It's a look into the brain of 8 year old me. Its about building a story out of stuff. So, a lot of these paintings are about pretending, building, making and playing. During the process hidden memories pour out. Its like dumping an old box of photos into my brain. Yeah, catharsis! I'm also constantly getting new ideas for more pictures.

As you can see the set-up goes through a lot before I settle on a paintable subject. I want it to look carefree and random while being a powerful design. That takes days of play and experimentation.
I liked the idea of paneling, but I felt the cardboard castle- similar value and color-  got lost. 
I have to thank Carl Samson for the extremely appropriate Joan of Arc beans box he found in the attic of the Wessel House.
The label on the glue bottle was too modern so I had to print out an image I found online of one from the 70s.
I turned the background panels around and painted them blue which gave the appearance of a mysterious dark sky. A blue table would be too much, so I tried a table cloth, but it was too busy and the newspaper and white horses got lost.
The news paper was newish, but it had an old photo of Ronald and Nancy Regan on front so I figured that was good enough.
I spent a good three days adjusting and doing sketches to get from the above photo to this one.


This old red card table was perfect. It worked well with the rest of the colors and the black end caps and rivets had a shape and feel which went well with the castle. I had tried to have a chair in the front of another painting but could not get the design to work. We had some old chairs that I was able to take apart and put on stilts to get it to the right height. Using my adjustable still life table, I set up a bit lower than usual- essential from the viewpoint of an 8 year old. As a child I use a lot of toilet paper tubes and Irish Spring soap boxes to build things. The current Irish Spring packaging is very different. I found images of boxes online, built a flat box in photoshop and printed it on cardboard and folded up my own 1979 soap box. The purple dinosaur was the right size but the wrong color, so I painted it blue and added the complimentary orange wings.

Here is the painting and the final set up after two or thee days of painting.
I made some changes to the set up as the painting developed, adding the clock back in to the upper left and a red shield over the door to strengthen the center. I may do a second post about the painting process in my next post.

Saturday, June 4, 2016

River of Blood- Sugary Blood!

Battle at the Red River, 16x20, oil on linen, © 2016 Richard J. Luschek II


The recent theme for my work is kids at play- and more specifically memories of my own childhood, so they are about a young Richard Luschek at play. The above painting is an attempt to move away from the emphasis on the word still in still-life and focus on adding more life. I decided I needed to step up the game in realism, not so much in execution and technique but thematically. My focus is still on design and the visual abstraction but the mood of the painting has to feel like a child at play.
I discussed the development of this idea in an earlier post based on the following set up. It felt stiff and not very real. It actually was separated into two different paintings.


This new direction resulted in my studio becoming a bit of a construction zone as I built some sets for my still life arrangements. I bought fake flooring and base molding, and made any props needed to give this a feel of being on the floor in the corner of the room.


After a week of arranging the stuff I felt the center of interest was weak. I needed a strong diagonal leading into the picture. The idea of using Red Pop just happened. I cut some red paper into a puddle shape to get a visual idea and it all started to fall into place.


This is a photo after my first day lay-in. I poured red pop on the table and painted it as quickly as I could as it would slowly run off the edge and out of the set up. I was spending too much time cleaning up red pop. I tried to level the floor but the pop would find a way to run away or just slowly evaporate.


I decided I needed a something that would give me the look of liquid but not move. I thought I could paint it on the floor, but color and transparency were an issue. I finally decided that I could use the recipe for fake blood: Corn syrup and food coloring. The recipe for red pop is not that different- it was just too wet. I mixed up my concoction and drizzled it in to place. I had to use a brush to mold and shape the puddle into shape. It eventually set up and I had my stationary puddle. The only issue was that it would get a skin on it over time and wrinkle. I would just brush water on it to flatten it out and reactivate the liquid appearance. 
I eventually had to scrape the corn syrup up and clean the area adding real red pop to the scene again to finish the painting. The spill was the most difficult area of the painting. I repainted it for a few days  till I was satisfied.

So this is the start of my new plan to blog more. If you follow this blog you know I have said that before, but this time I discovered there is this cool app on my phone that will remind me to post. Its called the calendar app, I highly recommend it.

Friday, January 22, 2016

Time To Put On A Show!

After some reflection, some depression, some self flagellation and a round of the typical New Years promises, I have decided that I need to step up my game. While I feel like I am improving as a painter, the subjects and compositions have gotten stale and safe.
In December I started setting up a still life but it just was not making me tingle. I had a discussion with my friend Joe Slucher. While looking at one of my struggling still life set ups, he mentioned that it seemed forced, "Did your mother let you play with your toys at the table?"


The rough idea was there, but it was obviously not working. His comment was like an creative wedgie for my brain. It got me thinking about the realism of the subject. I am painting these scenes of kids playing- really memories from my childhood. These scenes of the 'kid version of me' need to be more truthful. How do kids play? More specifically, how did I play, and how can I create good design out of that?
Kids play on the floor. Kids are messy, nasty creatures. If you have boys you can't have nice things.
I am still pretty immature like most artists I know, but I forgot what its like to play. What did 8 year old Richard play like? Oh, I know what you're thinking- "He played beautifully and brilliantly!"

Starting from scratch, I split this still life into two set ups. In order to do this, one of the issue I had was that the backdrop is not big enough and I'd like to have the option to work in a corner, which allows for various planes of value. Also, I needed an area where I could set up on the floor if needed. I had a small sheet of plywood on the walls that I could paint for back drops but it was not good enough. I had to go bigger.

So I built some walls in that spot. I thought about using drywall, but figured plywood would be more sturdy and could be moved to the other side of the room if I wanted.

I glued and screwed these flats and used joint compound on the seam. The side wall is just screwed so I can move it if I want. I added some old picture rail I found to the top and curtain rods on hooks so I can add fabric to any scene. I wanted a wood floor and found that you could buy sample boards of Pergo (fake wood flooring) for $5 a board. I added the base molding and had a faux corner of the room set up on which to assemble my scenes. One added feature I never thought of was that the back of the side wall now gave me a place to store my stretcher bars in an upright and organized fashion.


To the right I have another set up on top of my file cabinet that needed some work too. I decided to make a mini corner of the room even though this is a higher straight on view.
I built the small corner for the top a while ago and just needed to add base molding and a floor- all of which is loose and can be removed. The nice think is that later on I can repaint the walls a new color, paint the molding, change out the floor or even add carpet. 

I then was thinking it would be nice to have an outlet or light switch to add for more options.
I drilled out the rivets on an outlet and switch, then sanded them down till they were flat. I added some tape on the back to clean it up and I have flat set decorations.


They could be added to any scene. Here I even plugged an old cord- after cutting off the tines a bit.


I used some wax to stick the light switch to the wall in my other set up.
I am pretty excited about these new 'stages'. I look forward to working on the paintings for the next few weeks.
More about these paintings coming soon.


Wednesday, August 17, 2011

Framing Options

Last post I discussed my newest painting. I have been trying to do standard size paintings so I can easily get frames, but this time I strayed from that promise to myself and painted an arched painting for which a special frame was needed.
I thought I would post the process for making these special frames.You can follow along and make some yourself, though it would be best that you have some basic knowledge of woodworking and own a few tools. If you don't, I suggest you make friends with someone that does- Oh, and by the way. I don't mean me. I have enough friends and this blog post is as far as I am willing to go.

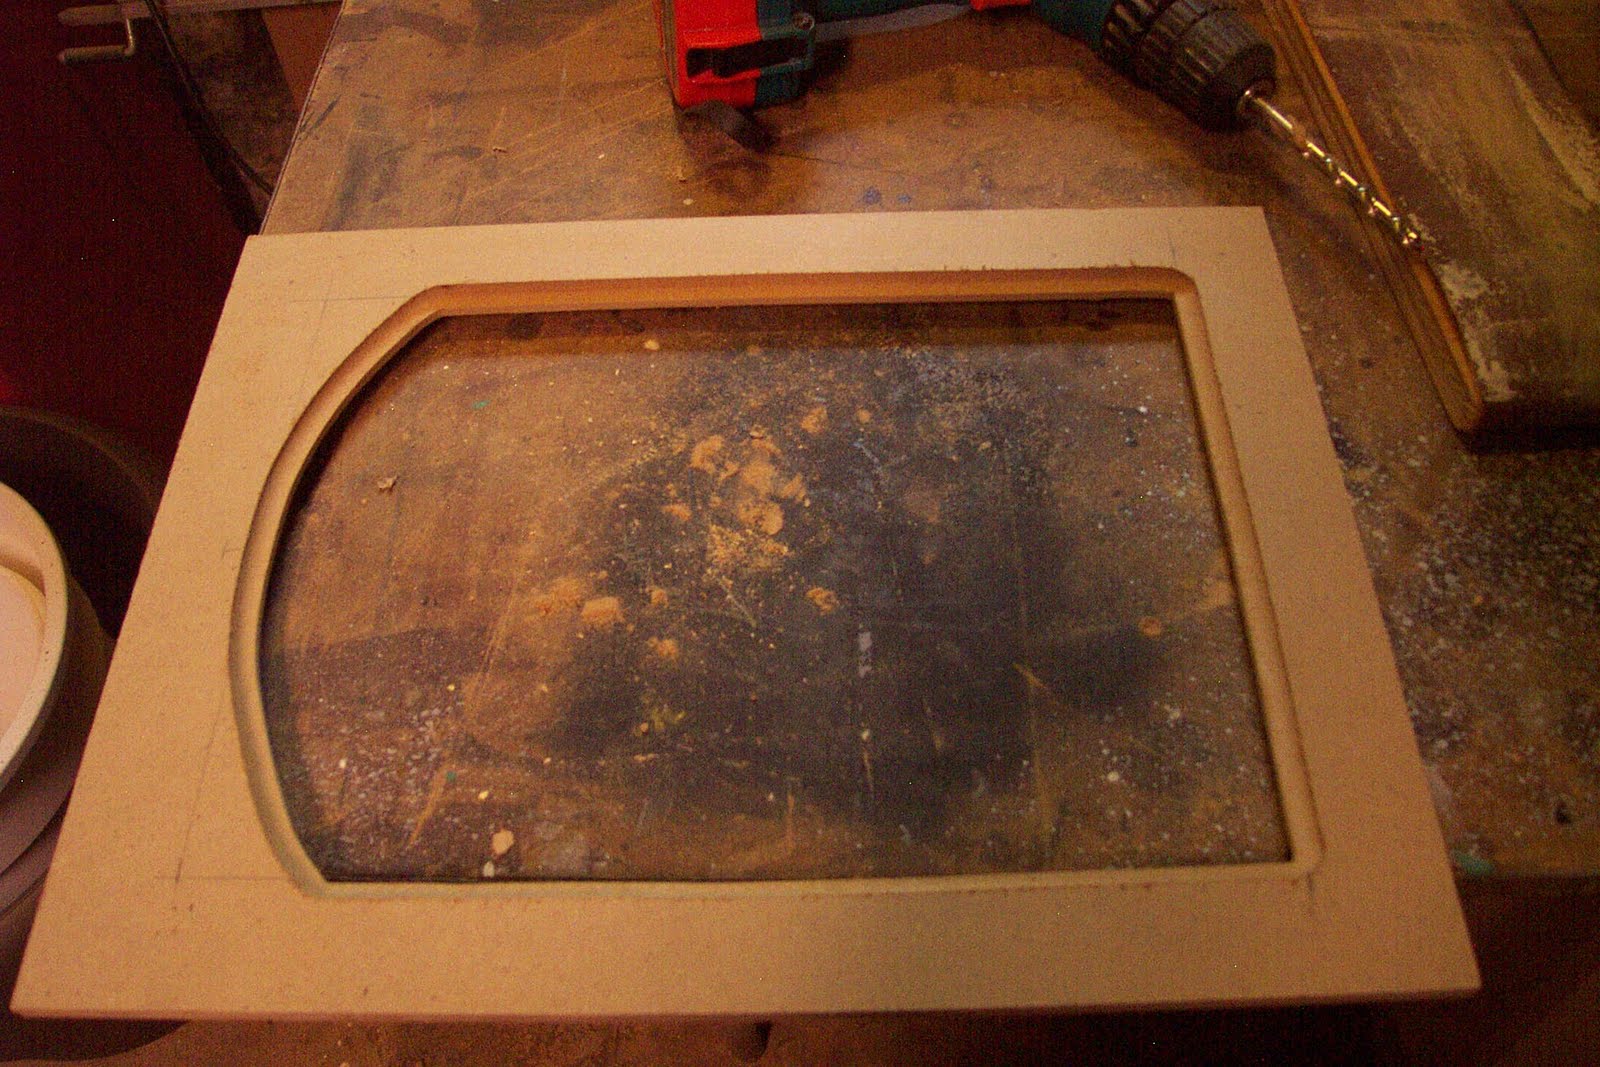
Basic idea here is to take a frame you already have, place a panel in the frame where the painting would normally go, then cut a new opening for a smaller picture. This can be done for any size or shape. This time we will be making an arched insert. I really enjoy the arched top paintings. It is a pleasant shape in which I enjoy composing.
If you have a lot of frames hanging around the studio this also opens up your options. Sometimes a frames is not quite the right size or shape. I have quite the collection of old frames and am adding to that pile all the time. Small paintings often feel better with a big frame on. So you can take a 6 x 8 painting, using one of these panels to add an inch all around, and now the painting and panel will fit an 8 x 10 frame (did that make sense?)

After showing the steps to make the insert I will show you how to apply a painted finish. One "do it yourself" frame finish I am almost always happy with is the flat black, hand rubbed finish. I will explain how that is done at the end of this demonstration.

Below is a frame I purchased for $20 at Castner Frames. It is for a 16 x 12 picture, the opening is 15 1/4 by 11 1/4. For my 13 x 9 painting with an arched top, this frame will work perfectly. I just need to make an insert. This is basically like making a fancy matte for a frame out of wood. While I am doing this for an arched top frame, it can be done for a square or oval picture.

Step one- Cut your insert:
I will start with a quote by Norm Abram, one of my heroes. "Before we use any power tools, let's take a moment to talk about shop safety. Be sure to read, understand, and follow all the safety rules that come with your power tools. Knowing how to use your power tools properly will greatly reduce the risk of personal injury. And remember this: there is no more important safety rule than to wear these — safety glasses." 

I have a 16 x 12" frame, so with the rabbit in the back I need and insert that will fit. Measure its exact size to be sure. For my insert I use a material called MDF (Medium Density Fiberboard). It is like a hard cardboard, made of paper fiber, wax and resin. It cuts like wood and takes paint well. You can buy handy 2' x4'  sheets at most hardware stores. For these panels I normally like to use 1/2" thick, but all I had was 3/4". Either thickness will work.
I cut a piece to fit tightly in the frame rabbet- make sure it is square (you can check the diagonals, corner to corner, making sure those measurements are equal). I used a table saw, but a jig saw will work. I penciled out the size and shape of the new opening on the panel, making sure to center it. I drilled holes in the corners big enough to accept the jig saw blade.


Step Two- Cut out opening:
I use my trusty Jig Saw to follow the line as closely as I can.

Step 3- Smooth the cuts:
Using wood files and sand paper (100 grit) I sand the cut edges smooth. This step is important, so spend the time to get this right. You want smooth edged and nice curve. The saw is not exacting and will need to be cleaned up. I have an orbital sander that helped  speed things up. Be careful to not sand at an angle or dig into the corners.
Step 4:- Route the edges:
You will of course need a router and a few bits. You need one bit for the  edge that meets the painting. I used a simple cove bit- shown below on the right. A rabbet bit is used to cut the space in the back of the panel for the painting to fit into. The 45 degree chamfer bit eases the outside edge of the back of the panel were it fits into the frame. This is not necessary, but since I had a larger 3/4 thick board it just looked better. Read all safety precautions when doing this step. MDF resins contain small amounts of Formaldehyde, so wear a mask with cutting and sanding.


If you do not have a router, you could probably file an edge on the front as a transition, and just use z clamps to attach the painting to the back without a rabbet. This will take some time to get your hand filed edge even, but it could be done.

Step 5- Chisel the corners:
The router bits are of course round, resulting in rounded corners. You can leave them, but I think it looks cheap. I use a straight edge to mark off squared edges and use carving chisels to cut them square. I first cut straight into the corner, with a straight blade. Next I carefully make slight cuts on the squared lines I drew. Use the rounded chisel to ease out the material from that corner until it looks like a smooth transition. Sanding is usually required to clean things up. Go slow, as it is easier to take off more than to add some back.


 Step 6- Suck it up and don't be a wuss.
Sorry for the graphic nature of the next image, but I want to demonstrate two things. One, that you need to be careful when using sharp chisels, always cutting away from your hand. Second, I wanted you to see what a total bad ass I am.
Did I stop here? No, I continued on like a man.

Yeah, Sorry about that Norm.

Step 7- Attach insert into frame:
You need to attach the MDF insert into the frame. I used pocket screws, being careful to not screw through the front of the frame. I have done this before. When this happens it is followed by about 15 minutes of profanity, and an extra 30 minutes of work repairing the frame. You can glue the insert in, use nails or just use z brackets as if you were putting a painting in the frame. I also fill the screw holes so it looks better. Not necessary unless you have OCD like I do. Finally, go over the frame, sand any sharp edges front and back, fill any holes and generally make sure the frame is ready for paint. I clean off any dust with a rag or tack cloth.
Step 8- Prime and paint:
I used Red Iron Oxide primer in a spray can to coat the frame. I suggest you do this step outside if you can. You will find any remaining imperfections after you prime it. You can fill and sand those and then prime it again. I usually paint the front and back making sure to cover all the edges. The MDF will suck up a lot of paint. Painting them will make the fibers swell on the edges a bit. Sanding and priming a few times will get them very smooth. After the primer dries (usually I wait 24 hours) I coat it with a fast drying ultra flat black. One trick I do, is to force the paint to crack. I like this look as it adds age and variety. If you want some cracked or wrinkled looked to the finish, Look for a can with  instructions suggesting you recoat it withing two hours or to wait 5 days. Paint will continue to cure even after it is dry to the touch. The paint is still uncured enough within two hours to accept a second coat. The paint will tighten and move as it cures for days. I disobey the directions and paint it after the suggested time. I wait about 4 hours and then spray it with a heavy coat, being careful to not get any runs. I paint heavier on the larger flat surfaces. This top coat which dries and shrinks faster than the under coat will start to crack in a few minutes. This is not an exact science, but it almost always works. I will say on this frame I got just a bit carried away. I prefer the cracking to be a bit more subtle.
 Here is the frame after a final coat. You can click for a close up view to see how the paint cracked.
 Step 9- Silver leafed edge and Final finishing :
I decided to add a silver leaf edge. There is a silver coffee pot in the painting so it will match. A leafed edge can help ease the transition from the frame to painting. I am not a leafing expert. This topic would require its own blog post. I suggest you look elsewhere for gold or silver leaf advice. If you want you can also paint the edge silver or gold. At times that looks almost as good.
I lightly sand the frame, especially the raised edges slightly to get through the black paint to the red primer. This gives it some age, distress and variety. The final step is to use butchers wax. Most hardware stores should carry the wax. Using a clean rag, I scoop up some wax, giving it a nice even coat. I then use Rotten stone, a gray powder used for polishing. I use that to dust the corners and draw around the edges with a brush that has been dipped in the power. Blow off the excess. After the wax as set up a bit, I take a clean soft cloth and buff the frame. It will get a very deep shinny finish. I leave the rotten stone in the corners. It will stick to the wax and give it an aged look that I like. You can see that powder stuck in the cracked paint as well.
 On the back I add the picture wire and the z clips for holding the painting.

Here it is all put together.
I really should stop making frames and just paint more pictures- but wasn't that fun?