 |
| "Only Do", oil on linen, 11x14, © copyright Richard Luschek 2017 private collection |
I completed this painting a while a while ago. It now has a wonderful home in Brooklyn, NY. I had so much fun doing the painting and making the frame that I thought this would be a great topic to ramble on about.
This picture started out as a demo I painted for a group of kids in Ripley, Ohio. I did a talk and demonstration at the library before helping the kids set up and paint their own still lifes.
I have painted something very similar once before, as I am a Star Wars "kid" it is a recurring theme that I have no problem revisiting.
The idea was to have Yoda using the force to lift the toy plane- or at least appear to lift the plane. You barely notice the coffee cup, right?
Demonstrations are fun- but challenging. I like to talk during demos and I've found I can either talk well, or paint well. I tend to choose the former so I don't sound like an idiot. Honestly, I thought it turned out OK considering the circumstances.
In a demo you have limited time, limited concentration and in this case an audience of limited attention span. So I stopped when I could tell I was losing their interest- about 35 minutes. Often I will just wipe a demo canvas down and paint something else but I like this one and I decided to set it up in the studio and spend some time finishing it.
Once I got it back in the studio, I tried to set it up similarly to what I had in Ripley. The lighting was very different but it was a better looking composition.
Here are a few shots of the painting in process- each panel representing roughly a day of work. The first panel shows me making sure the drawing and the layout worked. I was painting over the demo painting so I worked a bit more bold then I normally do. Day two I spent time pushing it back, losing edges and getting breadth of treatment.
With the painting complete it was time to consider the frame. I wanted something unique and different. I love playing around and experimenting with frames. Lately I have been trying to spend more time painting and less time framing. That's what frame shops are for.
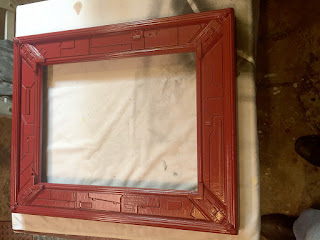
I had a cheap gold frame that was the right size. I thought this time I would go really crazy and make the frame look like a space station.
First thing I wanted to do was replace the corner flourish with Storm Trooper heads. I mean, this decision was obvious, right?
I made press molds in non-hardening clay and then cast the head by mixing up some Durhams Rock Hard Putty. Its wonderful stuff. I highly recommend it for frame repair, home repair, or any Martha Stewart crafty ideas you may have. Once it hardened they were popped out of the mold and sanded. I had to cast quite a few to get 4 good casts.
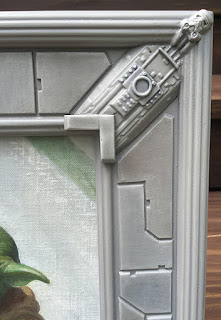
I had recently found a part off an old Star Wars toy in the bottom of a junk drawer. Back in the day (mid to late 70's), Star Wars toys came with assembly instructions, a list of parts, and an order form. If something broke you could send the form with proof of purchase into Kenner and they would mail you a replacement part. The door on my Millennium Falcon broke (probably during an intense battle) so I had ordered a new one. This old broken toy part was perfect for the corners of my frame. I cut it on the band saw to so it fit and laid in on a bed of clay in a Tupperware container so I could make a mold. The piece I cut off was used on another part of the frame.
The first mold was a disaster. I used water based alginate casting material and it did not go well. I was mushy and crumbling as I used it. I tried again with a recipe I found online, using a tube of 100% silicone caulk thinned with mineral spirits, corn starch, a few drops of glycerine and acrylic paint. The next mold, while a bit stinky, was smooth and durable. Again using Durhams, I was able to cast 4 detailed corner pieces. I still have the mold, so this part may appear on more frames in the future.
Next on the list was to make the flat areas look like panels on a space vehicle. I tend to save all the cardboard from the backs of drawing pads. I comes in very handy. I cut panels to fill the areas between the corners, sketched out the designs and then cut them all with bevels. in a random pattern.
They were all numbered, laid out so I didnt get lost and later glued into place.
I used some left over model car parts (I recently have been building a model car for another still life I'm working on), strips of balsa wood, metal thumb tacks, and a piece of a plastic zip tie to decorate the frame.
I spray on automotive primer to seal it. I filled and sanded as needed.
A few coats and it was starting to look unified and smooth. For the final coat I went with a automotive flat gray. Space ship paint from NASA was just too costly.
After I got a few coat, I used brown and blue acrylic washes to tone the frame. I dry brushed raised areas with a light grey to highlight the edges and give it some dimension. Before a final clear coat I dusted it with various powdered pigments to get some age on the frame.
A close-up shot after the weathering and toning.
The frame took at least as long as the painting, but it was worth the effort.


No comments:
Post a Comment